Post by Richo on Jul 22, 2012 20:33:51 GMT 10
Given that Noise is my daily ride and its 35km to work I decided that I needed saddlebags. After searching the web for decent bags at a reasonable price I stumbled across www.bibblebar.com.au. Joe has great looking gear at very reasonable prices.
I decided that a trip down the road was in order as I am always a bit wary about forking out what little "play money" I have without seeing the goods in the flesh. When I got to Joe's place it was after 6pm but he was more than happy to show me his new display shed and gave me a run down on all his gear. I was after the basic saddlebag as it was the cheapest option and although they are well made the leather is very plain and for an extra $100 I could get the slightly bigger and very nice looking deluxe bags. Deal done! I also bought the indicator relocating plate and the detachable brackets for the saddlebags. Both of these items are polished Stainless steel, actually ALL Joe's metal products are!
I also bought the rain covers for the bags and a bike cover as well but as I haven't used them yet I won't talk too much about them.
So I had to move my indicators, JOY that means wiring, I HATE wiring. But I had that sorted out in about an hour and a half and I am very happy with how the plate looks.
So now I had to mount the brackets to the fender rail. This is where things got a little painful. The caphead screws (M10x1.25mm) have to be purchased from a Nut and Bolt store. No problem, the heads of the screws however don't fit into the machined recess of the mounting bracket. The brackets will work like this but they don't look fantastic so I'll turn them down at work tomorrow (10 minute job at most) but for those that don't have a lathe or the skills required this could be annoying. The other painful part is that the fender rail on the shadow is not parallel to the frame. This makes the bracket lock itself onto the bike as its pushing on itself. A square form spring washer spaced the bracket out perfectly and they now work as intended. Again I could turn the bracket down and eliminate the washer but as I MAY change bikes later I'll leave it as is as the washer isn't a big deal.
Mounting the bag to the bracket is the next step this is easier with two people and its a fiddle job as its only really able to be done by eye. I did mine when my dad came to visit and its still about 10mm out. But only really noticeable if your looking for it.
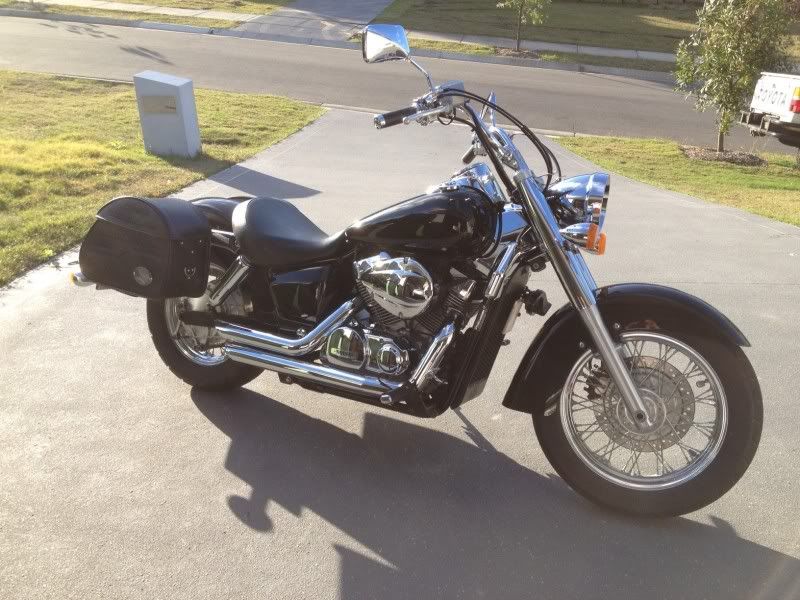
So a quick blat down the road and some dodging and weaving to see if the bags wiggle around and nothing so far so I'm happy as the proverbial pig. As far as how they look well what do you think?
I decided that a trip down the road was in order as I am always a bit wary about forking out what little "play money" I have without seeing the goods in the flesh. When I got to Joe's place it was after 6pm but he was more than happy to show me his new display shed and gave me a run down on all his gear. I was after the basic saddlebag as it was the cheapest option and although they are well made the leather is very plain and for an extra $100 I could get the slightly bigger and very nice looking deluxe bags. Deal done! I also bought the indicator relocating plate and the detachable brackets for the saddlebags. Both of these items are polished Stainless steel, actually ALL Joe's metal products are!
I also bought the rain covers for the bags and a bike cover as well but as I haven't used them yet I won't talk too much about them.
So I had to move my indicators, JOY that means wiring, I HATE wiring. But I had that sorted out in about an hour and a half and I am very happy with how the plate looks.
So now I had to mount the brackets to the fender rail. This is where things got a little painful. The caphead screws (M10x1.25mm) have to be purchased from a Nut and Bolt store. No problem, the heads of the screws however don't fit into the machined recess of the mounting bracket. The brackets will work like this but they don't look fantastic so I'll turn them down at work tomorrow (10 minute job at most) but for those that don't have a lathe or the skills required this could be annoying. The other painful part is that the fender rail on the shadow is not parallel to the frame. This makes the bracket lock itself onto the bike as its pushing on itself. A square form spring washer spaced the bracket out perfectly and they now work as intended. Again I could turn the bracket down and eliminate the washer but as I MAY change bikes later I'll leave it as is as the washer isn't a big deal.
Mounting the bag to the bracket is the next step this is easier with two people and its a fiddle job as its only really able to be done by eye. I did mine when my dad came to visit and its still about 10mm out. But only really noticeable if your looking for it.
So a quick blat down the road and some dodging and weaving to see if the bags wiggle around and nothing so far so I'm happy as the proverbial pig. As far as how they look well what do you think?

 The roundness of them keeps with the rear gaurd which is good . With the pillion seat on they might not go with the lines then but without yes. Pretty good prices he has i think . Only prob i think is that he is not bike specific but to his credit he informs people of this .