
Post by Deleted on Jul 3, 2013 17:04:29 GMT 10
Well I did a little write up about how much fun it was to install a HID light kit and it was suggested I stick it in here for all to see. So here it is with a bit of extra stuff that I got out of the thread from others ...
If you want to read the thread check it out here hondashadowriders.proboards.com/thread/2606/hid-light-kits
otherwise read on ...
Well I got the HID kit that Ray linked and it sat on my desk for a couple of weeks before I got the courage to start pulling things apart. So after asking Ray more questions about it all and getting a prompt reply from him (as usual, thanks heaps Ray, I dont know what I'd do without ya ) including pics, I decided that I'd better get off my haunches and do it this weekend.
As usual, what is said by other people to be a 20 minute job took me about 3 hours to finish, so I thought I'd post a little run down of the bits that made my life a tad difficult. First thing was to take off the plastic cover around the front of the bike that hides the wiring. One screw each side, then there's a little clip at the top of them that holds them together, now it has been said that you need to take the tank off to do this but Ray assured me that it could be done with a bit of careful jiggling, and it can, I kinda slid one side back while sliding the other side forwards and pushing on the metal clip with a tiny screwdriver. Not too hard just fiddly.
Next was taking apart the light, undo two screws again .. and now here's where I went a bit off course .. then you just pull the bottom of the front of the light til it pulls out a bit then let it down to let out the clip thingy at the top of the light. I couldn't figure this bit out at first and found another screw that I turned and turned for ages til I realised I was turning the light adjustment screw .. opps. At this stage I got out the bike manual and did it the right way.
This is what you are presented with ...
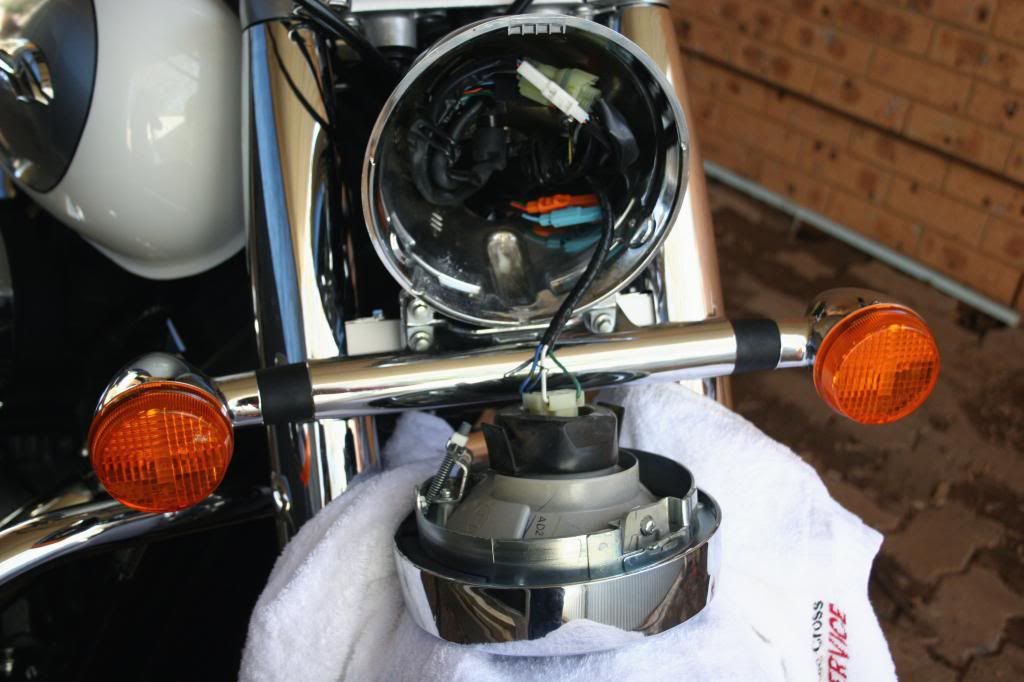
There isn't a lot of room in there and the kit comes with a hellova lot more to try to hide away somewhere ...
I found pulling out the standard bulb a bit difficult and ended up splitting the black rubber cover over that connection, that bit went into my left over bits bag til I found out whether I needed it or not. After asking on the original thread I was informed that you dont really need it, the kit is pretty well insulated and the chances of getting dust/moisture in there are pretty slim. You can get a replacement cover if you want at this link that Spinal supplied ...
www.hondapartshouse.com/oemparts/a/hon/5053fac6f870021c54be9820/headlight
This is what you get with the kit ...
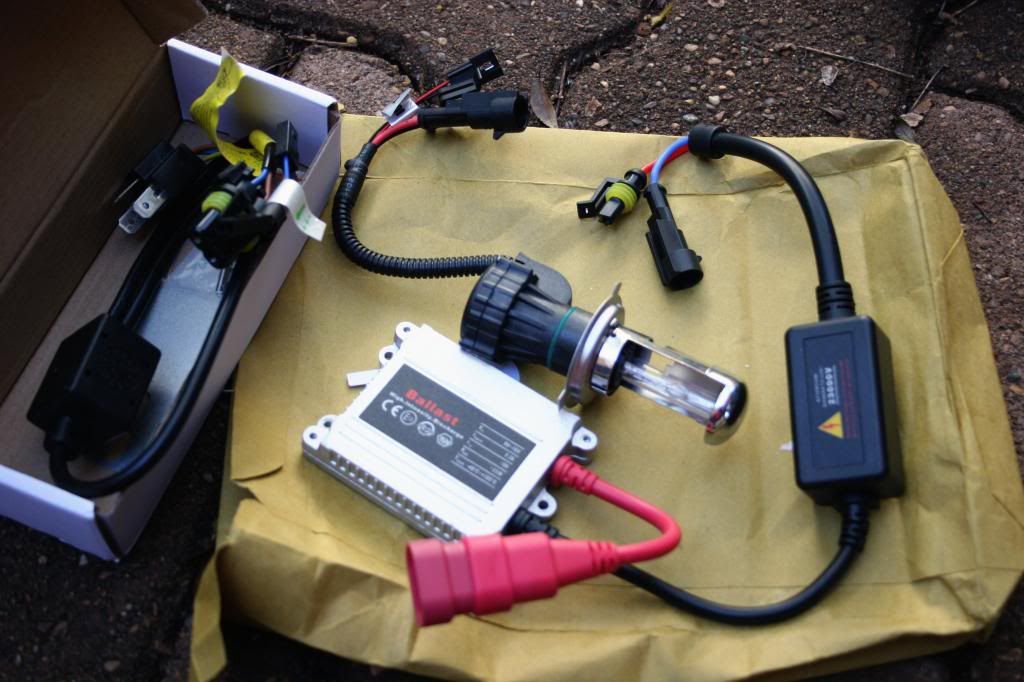
This is the guide that comes with the kit showing ya how it all goes together .. (curtesy of Spinal again )

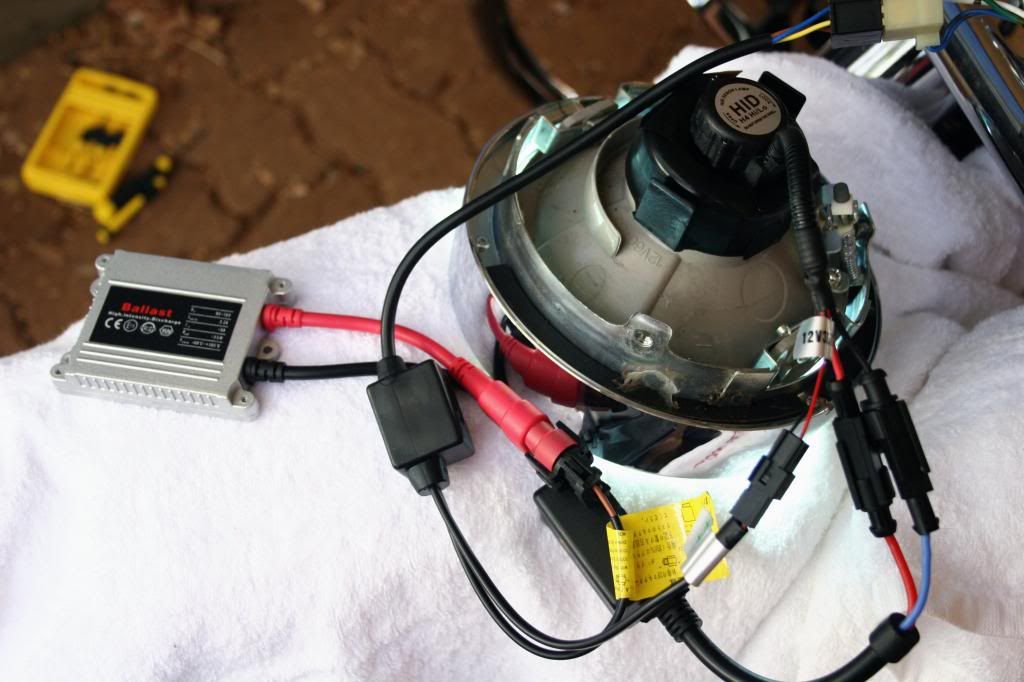
You just have to connect all that up and Bob's ya uncle .. yeah right. They give you instructions, that are kinda useful even if they are basic but the plugs will really only go one way except one which is from the ballast. A two pin plug that doesn't have anything on it to indicate which way it goes. The instructions do say to turn that plug around if the light doesn't light up once connected. So I put it all together on the guard and tested it before starting the jigsaw puzzle that is finding somewhere to put all this extra stuff. Turned on the ignition and nothing ... turn the plug around and turn on again .. nothing .. hmm. Pull it all apart while reading the meager instructions again ... it says that the wires on my bike might be different to the main plug and I will have to rewire the plug if it doesn't work ... grrr. Put it all together again and try once more before resorting to rewiring.
Yay we have light !!!
So now I had to pull some of the plugs back apart and feed them through the hole, and push and shove to fit the connections in the light. Plug everything back together and do some more pushing and shoving and re-arranging and finally the light would fit back into the cover. I had the ballast and the relay still outside to work on but the worst part by far was trying to get the silly little screws and their little dress thingys back into the light. So after fiddling with that for a while .. nope I didn't find an easy way it's a case of having to have 6 hands to hold the light together and hold the stupid little dress thingy in place (that just wants to drop down onto the pavers and get lost) while lining up holes and getting a screw in .. anyways it got done, now just needed to put the ballast and relay somewhere. The ballast actually fitted behind the plastic cover quite nicely, held firmly in place with three cable ties. I put on the cover and that just left the relay outside, it isn't very noticable as it's black, I just cable tied it to the mass of wiring along there ...
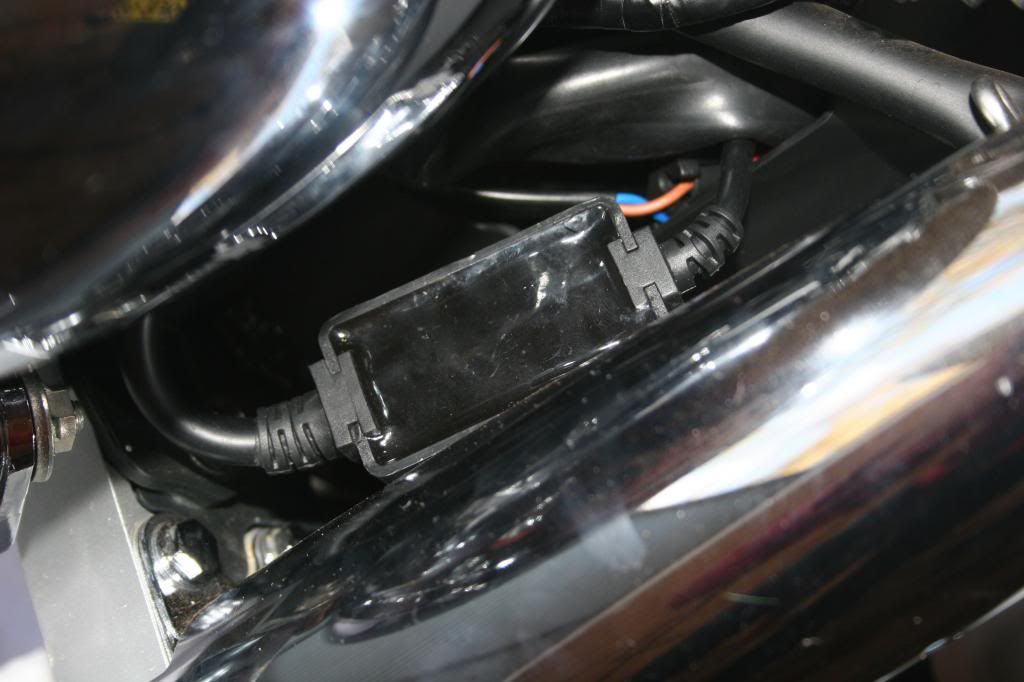
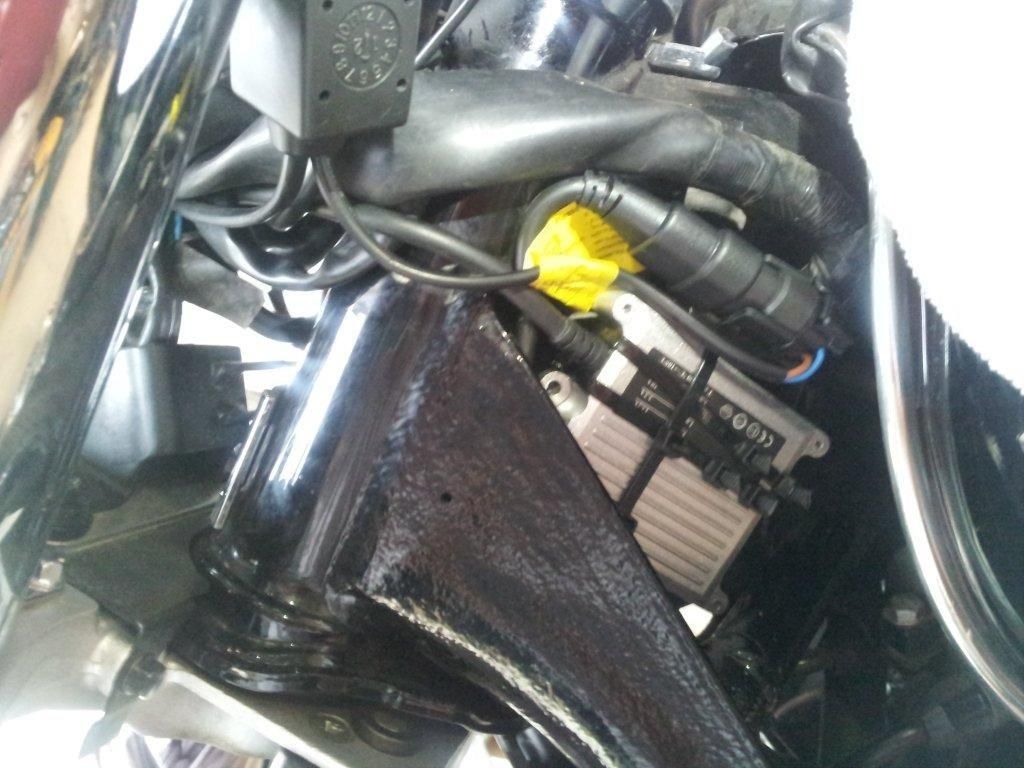
I didn't get pic of the ballast, so here's one from Ray showing where you can tuck it away neatly using cable ties ..
Job done, now to just make sure it was adjusted OK. That's when I remembered that I had been unscrewing that screw for ages earlier .. hint: dont do that! I couldn't get it to do anything, and when I looked at the light it was sitting crooked in the mount .. ugh this isn't good. You remember how much I hated putting those little screws in for the headlight .. I had to undo them again. I had unscrewed the adjustment screw so much it had sort of come out of it's little bracket thingy and the light was swinging in the breeze so to speak. I pulled it all apart and screwed the little bugger back into where it was supposed to be ... then spent another hour trying to get all the wires and connectors back into a spot where I could get the light back together, then chased the silly little dress thingy around the yard a few times before getting the stupid screws back in so that I could stand back and look at a headlight that was not only new and improved but also back together again!
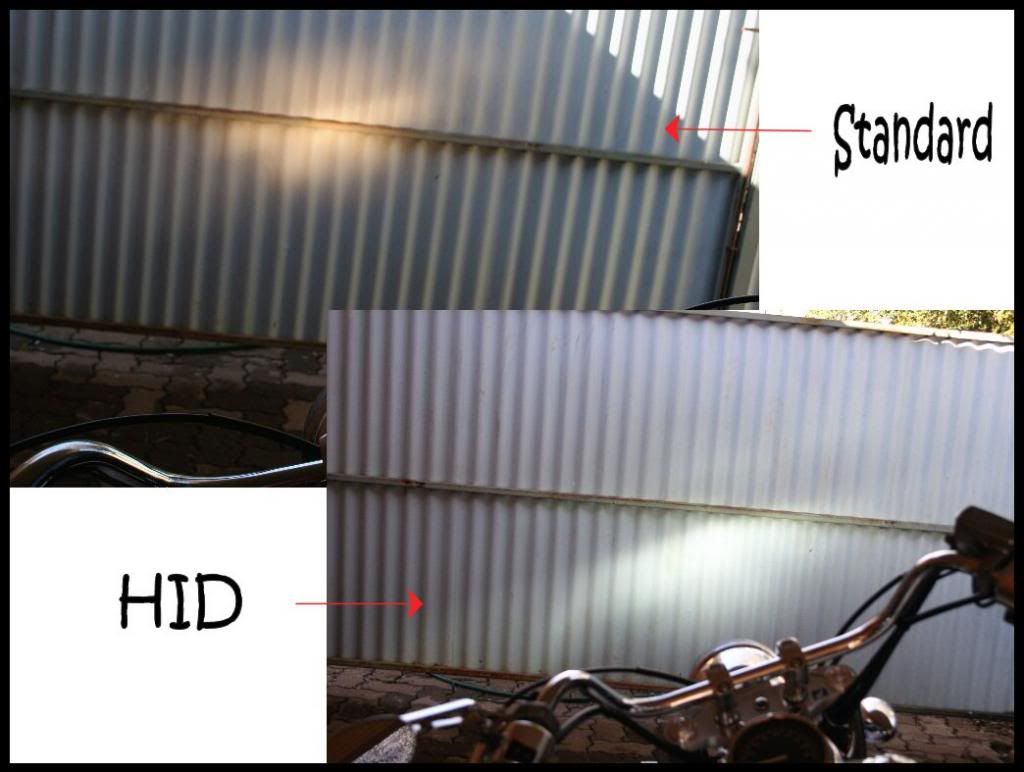
Really it wasn't that hard ... just a bit fiddly .. and well worth it for the difference it has made to my standard light ..
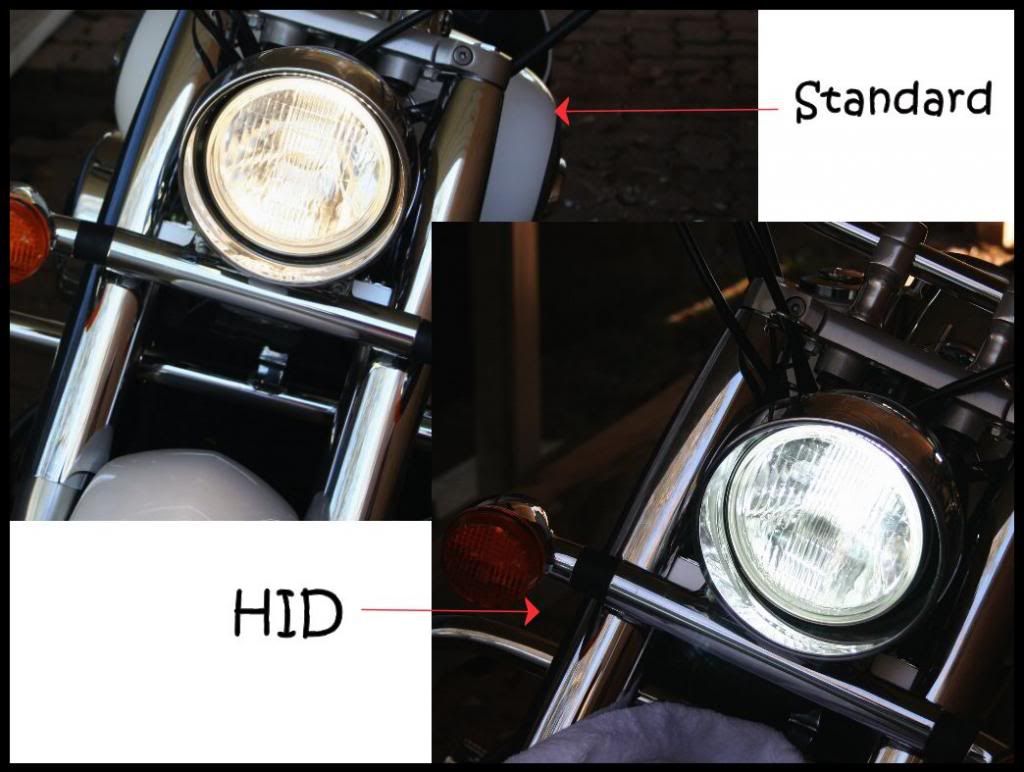
Note that last pic of the HID kit in the light was taken before I had adjusted the light .. and before I noticed that the light was crooked, when I look at the pic I can see just how out it was .. sheesh how did I not notice it before I screwed it all together
If you want to read the thread check it out here hondashadowriders.proboards.com/thread/2606/hid-light-kits
otherwise read on ...
Well I got the HID kit that Ray linked and it sat on my desk for a couple of weeks before I got the courage to start pulling things apart. So after asking Ray more questions about it all and getting a prompt reply from him (as usual, thanks heaps Ray, I dont know what I'd do without ya
 ) including pics, I decided that I'd better get off my haunches and do it this weekend.
As usual, what is said by other people to be a 20 minute job took me about 3 hours to finish, so I thought I'd post a little run down of the bits that made my life a tad difficult. First thing was to take off the plastic cover around the front of the bike that hides the wiring. One screw each side, then there's a little clip at the top of them that holds them together, now it has been said that you need to take the tank off to do this but Ray assured me that it could be done with a bit of careful jiggling, and it can, I kinda slid one side back while sliding the other side forwards and pushing on the metal clip with a tiny screwdriver. Not too hard just fiddly.
Next was taking apart the light, undo two screws again .. and now here's where I went a bit off course .. then you just pull the bottom of the front of the light til it pulls out a bit then let it down to let out the clip thingy at the top of the light. I couldn't figure this bit out at first and found another screw that I turned and turned for ages til I realised I was turning the light adjustment screw .. opps. At this stage I got out the bike manual and did it the right way.
This is what you are presented with ...

There isn't a lot of room in there and the kit comes with a hellova lot more to try to hide away somewhere ...
I found pulling out the standard bulb a bit difficult and ended up splitting the black rubber cover over that connection, that bit went into my left over bits bag til I found out whether I needed it or not. After asking on the original thread I was informed that you dont really need it, the kit is pretty well insulated and the chances of getting dust/moisture in there are pretty slim. You can get a replacement cover if you want at this link that Spinal supplied ...
www.hondapartshouse.com/oemparts/a/hon/5053fac6f870021c54be9820/headlight
This is what you get with the kit ...

This is the guide that comes with the kit showing ya how it all goes together .. (curtesy of Spinal again
)
You just have to connect all that up and Bob's ya uncle .. yeah right. They give you instructions, that are kinda useful even if they are basic but the plugs will really only go one way except one which is from the ballast. A two pin plug that doesn't have anything on it to indicate which way it goes. The instructions do say to turn that plug around if the light doesn't light up once connected. So I put it all together on the guard and tested it before starting the jigsaw puzzle that is finding somewhere to put all this extra stuff. Turned on the ignition and nothing ... turn the plug around and turn on again .. nothing .. hmm. Pull it all apart while reading the meager instructions again ... it says that the wires on my bike might be different to the main plug and I will have to rewire the plug if it doesn't work ... grrr. Put it all together again and try once more before resorting to rewiring.
Yay we have light !!!

So now I had to pull some of the plugs back apart and feed them through the hole, and push and shove to fit the connections in the light. Plug everything back together and do some more pushing and shoving and re-arranging and finally the light would fit back into the cover. I had the ballast and the relay still outside to work on but the worst part by far was trying to get the silly little screws and their little dress thingys back into the light. So after fiddling with that for a while .. nope I didn't find an easy way it's a case of having to have 6 hands to hold the light together and hold the stupid little dress thingy in place (that just wants to drop down onto the pavers and get lost) while lining up holes and getting a screw in .. anyways it got done, now just needed to put the ballast and relay somewhere. The ballast actually fitted behind the plastic cover quite nicely, held firmly in place with three cable ties. I put on the cover and that just left the relay outside, it isn't very noticable as it's black, I just cable tied it to the mass of wiring along there ...

I didn't get pic of the ballast, so here's one from Ray showing where you can tuck it away neatly using cable ties ..

Job done, now to just make sure it was adjusted OK. That's when I remembered that I had been unscrewing that screw for ages earlier .. hint: dont do that! I couldn't get it to do anything, and when I looked at the light it was sitting crooked in the mount .. ugh this isn't good. You remember how much I hated putting those little screws in for the headlight .. I had to undo them again. I had unscrewed the adjustment screw so much it had sort of come out of it's little bracket thingy and the light was swinging in the breeze so to speak. I pulled it all apart and screwed the little bugger back into where it was supposed to be ... then spent another hour trying to get all the wires and connectors back into a spot where I could get the light back together, then chased the silly little dress thingy around the yard a few times before getting the stupid screws back in so that I could stand back and look at a headlight that was not only new and improved but also back together again!
Really it wasn't that hard ... just a bit fiddly .. and well worth it for the difference it has made to my standard light ..


Note that last pic of the HID kit in the light was taken before I had adjusted the light .. and before I noticed that the light was crooked, when I look at the pic I can see just how out it was .. sheesh how did I not notice it before I screwed it all together


